This is the post I promised reviewing the components on the bicycle that I built for off-road touring.
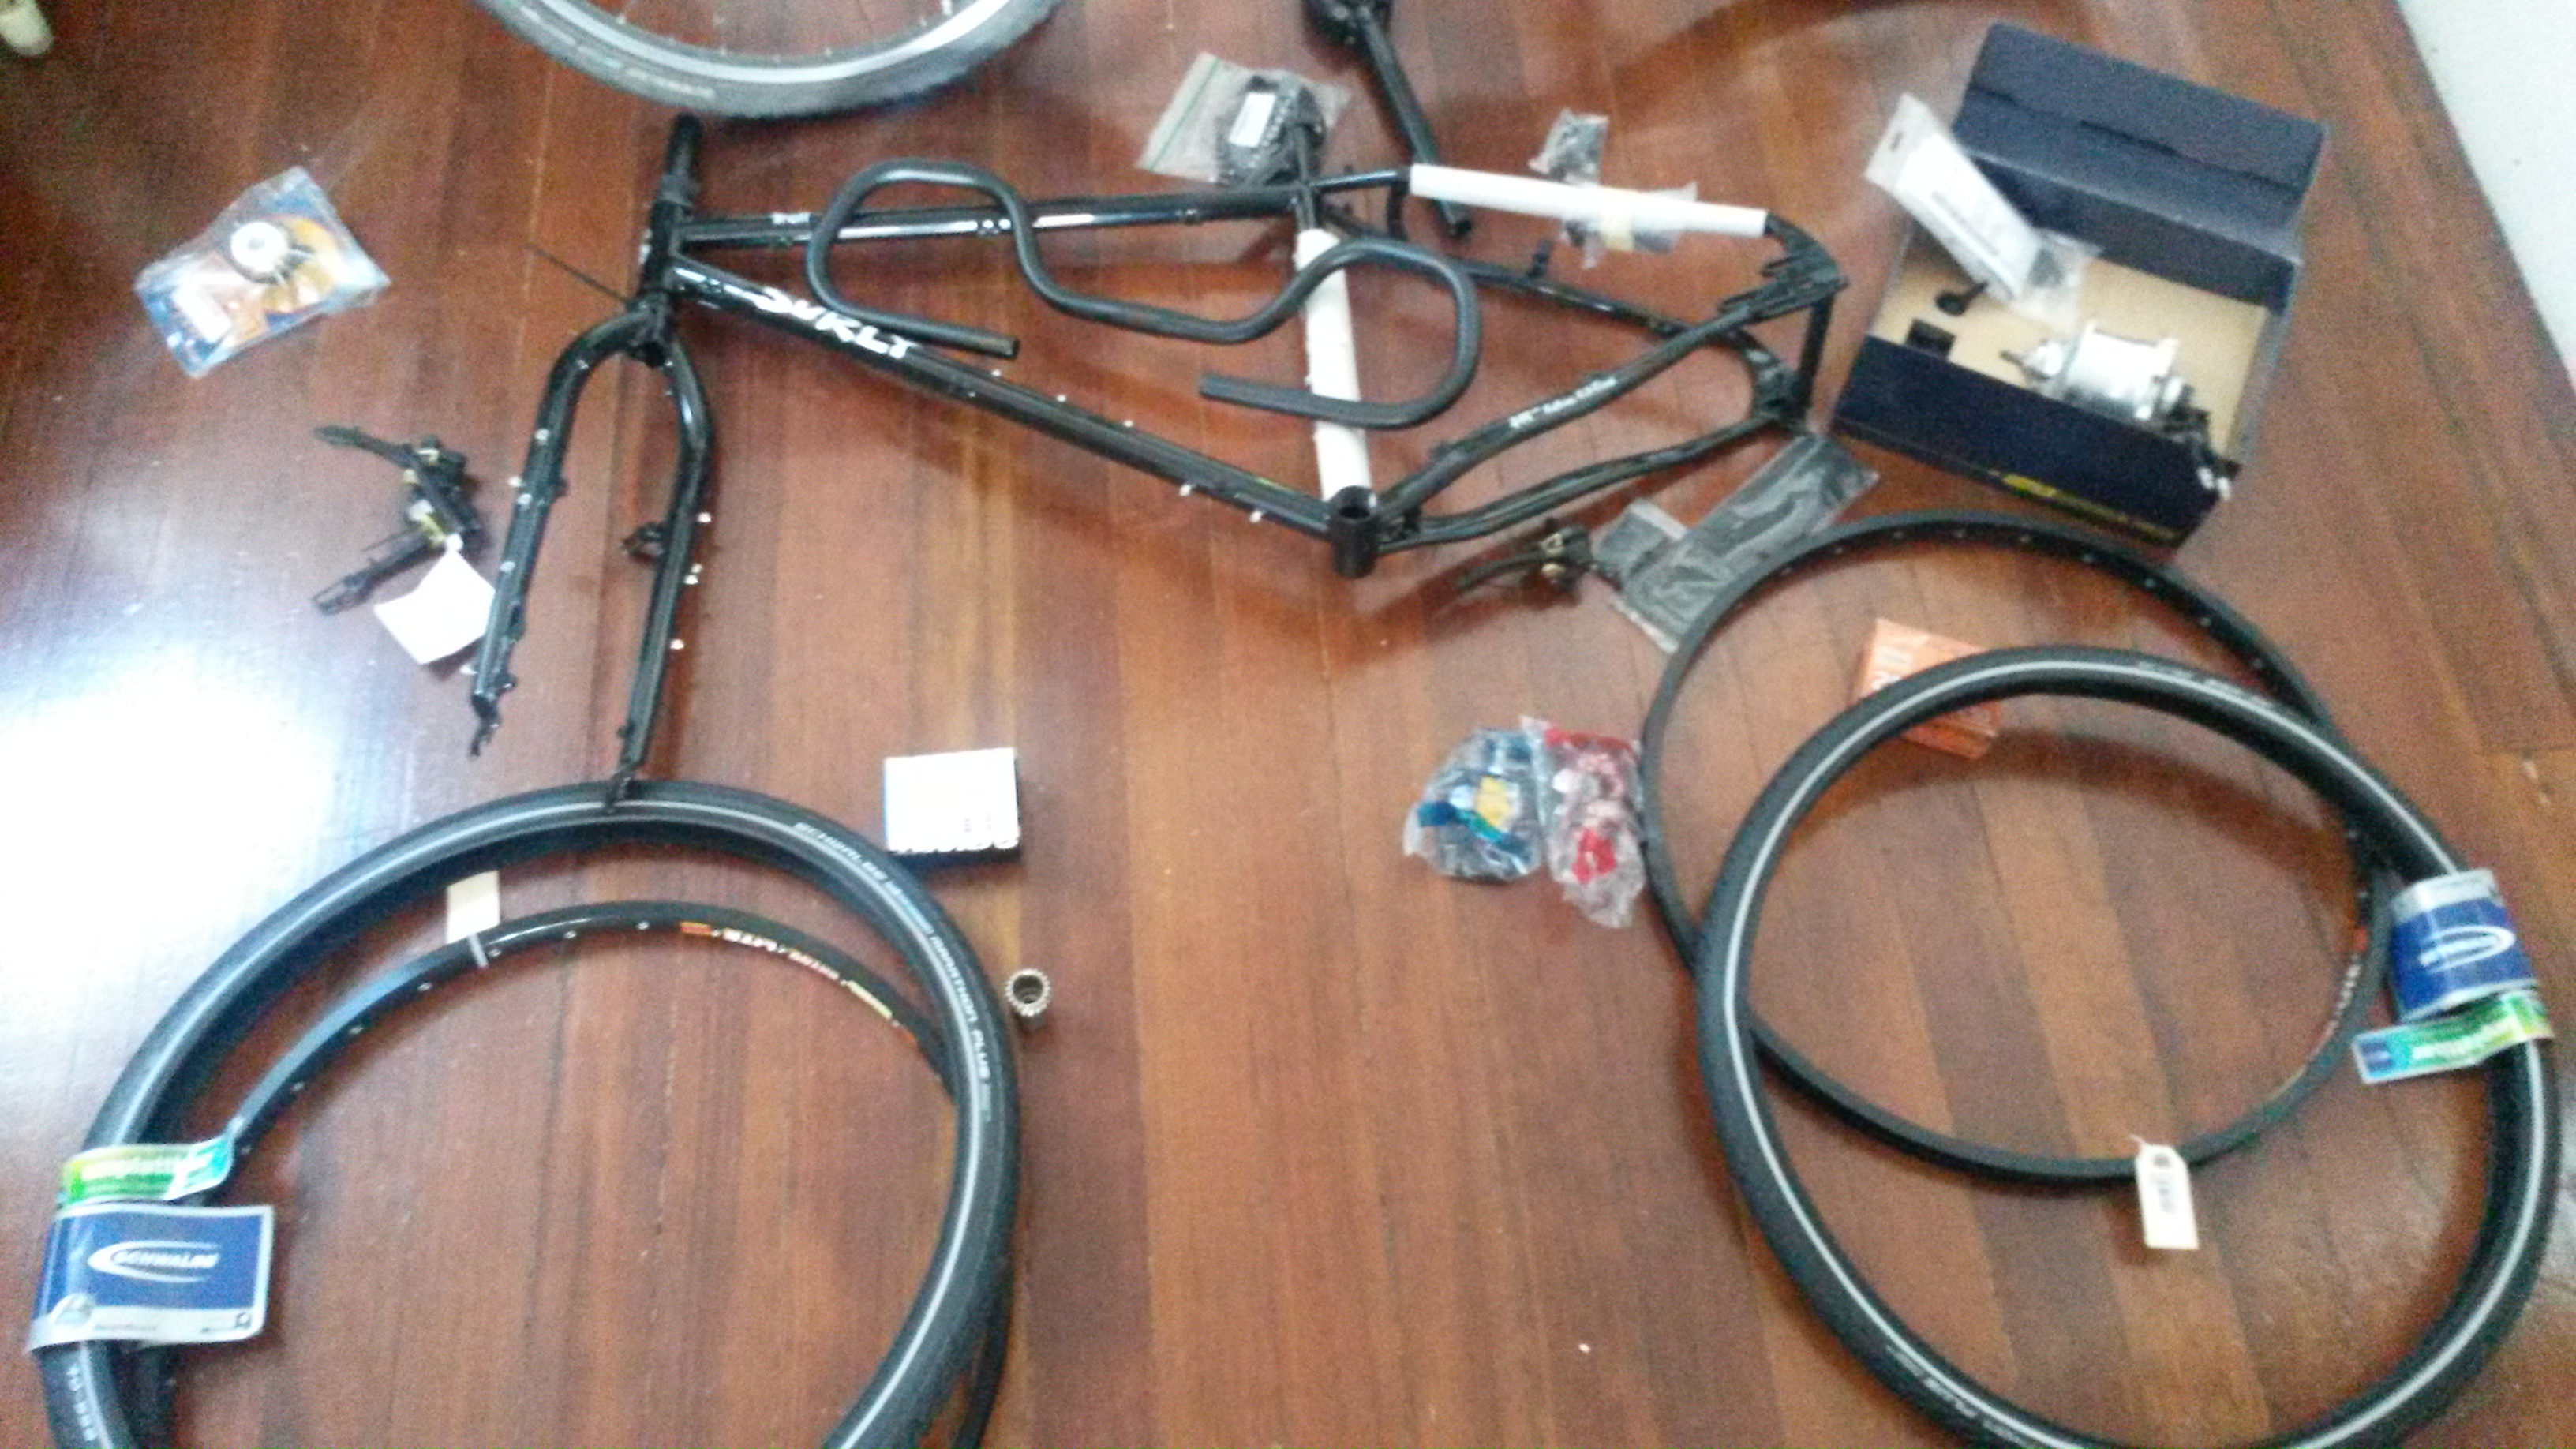
Bicycle components pre-build!
I’ve crossed 20+ countries by bicycle, mostly off-road, and after years of touring mostly on second-hand and standard mountain bikes, I decided to built a bike using the best components for off-road touring, optimizing the combination of durability, weight and ease of repair. So that I could learn to repair every part on the road, I built the bike myself. Building the bike was an incredibly rewarding experience in itself as I saw the bike go from the components parts to the final product, in 15 hours total work over one month. Time-lapse of this process:
Just a week after I built it, I got the chance to ride the Pacific Northwest of USA/Canada for a week, so it was a good first test. Although the first rocky downhill made me worried that I’d forgotten something vital. I haven’t managed any vacations since then but have been riding the bike around the San Francisco Bay Area every chance I get.
Overall, the bike been amazing to ride: more enjoyable than I thought possible! Things that I took for granted, like numb hands and an uncomfortable seat are no longer problems. Things I didn’t realize I needed, like shifting gears without moving, have significantly improved the overall experience, too. There’s still a few components I might swap out, like the stem and cranks, but overall it feels like I got most things right. If you’re considering building a bicycle designed for touring off-road (and I already know a few – thanks for your emails) here’s a review of the components:
| Part | Price | Manufacturer | Product / Type / Color | Supplier | Rating (/10) |
|---|---|---|---|---|---|
| Why this part? | |||||
| Frame | $525.00 | Surly | Troll | Freewheel Cycles, San Francisco | 10 |
| Surly’s Long Haul Trucker is *the* touring frame, and this is their 26″ (mountain bike) equivalent. The frame is steel. Compared to aluminium (aluminum), frame can be bent, dented and scratched without loss of integrity. Worse case scenario, it is much easier to weld a steel frame if it brakes. The frame might contribute to the smoother ride, too, as I’ve heard steel absorbs smaller shocks and vibrations better. | |||||
| Rack | $124.99 | Blackburn | EX-1 Stainless Rack | Blackburn | 9 |
| This is the classic touring rack, invented as an aluminium rack by Jim Blackburn in the 70s. This steel version has the same advantages as the steel frame: retains strength even when bent, dented or scratched, and can be easily welded/repaired anywhere in the world (+$35 shipping/tax). Minus 1 because the blackburn racks are a slightly off size for the most popular panniers, Ortlieb Classics, something these two companies should have worked out long ago. | |||||
| Powder coat | $180.00 | West Coast Powder Coating | Patina Green | West Coast Powder Coating | 10 |
| This was mostly for style, but the powder coat layer also provides some protection. Green is my favorite color and the exact color is the closest to one that’s common in eucalyptus trees, an homage to my home country of Australia where I rode my first tours. | |||||
| Rear Hub / Gears | $1,200.00 | Rohloff | Speedhub 500/14 TS, B-O 32h – silver | BikeParts.com | 10 |
| The advantages are huge! This internal hub is low maintence, only requiring an oil change after 10,000s of miles. Compared to external gears, the internal gears won’t get filled with mud and they are less likely to get damaged by hanging off the bike. Finally, the gears can be changed at a standstill, meaning that if I come to a stop halfway up a hill in a high gear, I can shift to a low gear on the spot and start riding: a nice feature for a heavily loaded bike! | |||||
| Crankset / Chain | $150.00 | Shimano | ? | Valencia St Cycles | 7 |
| The cranks I installed weren’t wide enough to align the chain to align with the hub, so my local bike store replaced it for me, adding their strongest chain. I didn’t record the exact price. I’m still looking for a good chain-guard solution to protect the drive chain from rocks and during transport, and I might end up replacing the whole set with something suitably durable. | |||||
| Drive Chain | $44.00 | Surly | Surly Ring 40t x 110mm stainless steel | BikeParts.com | 10 |
| I replaced the drive-chain that came with crankset with one made by Surly, the maker of the frame. As a company that makes touring bikes, I assume that their drive chain will be appropriately tough. The ’10’ is tentative, depending on how long it lasts | |||||
| Pedals | $87.71 | Shimano | Shimano Deore XT Trekking PD-T780 track pedel Trekking black | Oneness-World (Amazon) | 10 |
| I had very specific requirements: pedals that were clip-ins on one side, and could be ridden bare-foot on the other. Many pedals can only be ridden with clips, and many that combine a clip with a ‘regular’ pedal are made from sharp, gripping metal. I need pedals so that I’m not stranded if my shoes fall apart, get wet, or I just feel like taking my shoes off at camp and use the bike to quickly get around. | |||||
| Saddle | $130.00 | Brooks | B17 Narrow Bicycle Saddle (Black Steel Rails, Antique Brown) | Amazon | 8 |
| The Brooks Saddle is the most highly regarded by cyclists. The leather stretches to the exact shape of your … contours. This is from my previous bike, having worn it in over the last year – they can take 100 hours or more of riding to wear in, which is something you want to spread out over time. The biggest downside is that water can destroy them and they are easily damaged by scratching or pressing – they are leather, after all – and I don’t like that a fall or flooded river can mean that I lose comfort in my saddle in the middle of nowhere. | |||||
| Saddle Cover | $10.15 | Brooks | Brooks Saddle Cover, Medium | Bike A Mile (Amazon) | 9 |
| The biggest downside of the Brooks saddle is how easy the leather can be damaged by scratches or even just rain, so this help protects them. It would be even better if it wrapped underneath to protect the underside from water | |||||
| Seat Post | $138.62 | Cane Creek | 3G Thudbuster Long Travel Seatpost, 27.2, Black | Amazon | 10 |
| This is my first bike in 15 years without front suspension, so this seatpost is a concession. The Thudbuster has suspension that goes backwards as well as down, to maintain an even distance from the seat to the pedals to maintain consistent pressure while pedaling. | |||||
| Seat Post Cover | $16.20 | Cane Creek | Crudbuster Boot for Thudbuster | DC Innovations (Amazon) | 8 |
| Mud-cover to the suspension seat. and ‘8’ because it does the job, but seems like a pricey addition for a simple cover with big advertising. | |||||
| Headset | $150.00 | Chris King | Inset Threadless Headset | Valencia Cycles | 10 |
| The store recommended these are the smoothest and most durable of the headsets. I didn’t realize what a different smooth steering could make until using this. | |||||
| Rims (2) | $100.00 | Sun Ringle | Sun Rhyno Lite 26 32 Hole Black with Silver Sides | BikeParts.com | 9 |
| The Sun Rhyno Lites (just) beat out the Mavics 719s as my choice of rim. Mavics are popular for touring and I’ve been happy with them in the past, but they have more reported problems in online reviews (which could just be a result of their being more people using them). The extra width of the Rhyno’s seems better suited to a touring bike as there is more surface area between the tube/tire and rim, spreading out pressure/bumps so that pinch flats and a broken rim are less likely. I chose 32 hole rims and hubs as 36 and 40 are less common, meaning that I’m less likely to find replacements in remote places. My friend Peter had to spend three days traveling back and forth to Nairobi when we were in Kenya and he needed a replacement rim, only to find that the local bike store only stocked 32’s. The rims lose ‘1’ for having high walls that make changing tires tough – not looking forward to this on the road. | |||||
| Spokes + Nipples | $44.64 | Handmade | 72 14G Black Brass Bicycle spoke nipples | Ebay Seller: “childhood_dreams” | 10 |
| A recommendation from Jenny, who helped me build my first wheel. The ideal spoke length for my rear hub and rims was an odd number of millimeters, which you can’t get in factory-made spokes, so this was an added bonus to the extra care of hand-machined spokes. | |||||
| Front Hub | $51.21 | DT Swiss | DT Swiss 350 Front 32h QR Black | BikeParts.com | 9 |
| This was the most recommended front hub on a number of websites. Most 32 hole hubs are for mountain bikes and top-end ones have disk-brakes, so there weren’t too many choices for top-end front hubs without the disc-brake mounts. Great for what it is, but I wish there was a front hub for rim brakes that was purpose built for the weight and distances of touring. | |||||
| Rear Tire | $59.09 | Schwalbe | Marathon Plus Tour Tire Black, 26″ x 1.75″ | Jenson USA | 10 |
| This is the ultimate touring tire. In 3 months across Africa, I never got a puncture through one, while my friend Peter was getting thorns and scrap metal through his tires almost daily. | |||||
| Front Tire | $48.35 | Schwalbe | Marathon Mondial Race Guard Tire with Wire Bead, 26″ x 2.0″ | Amazon | 10 |
| From the same maker as the rear tire, this one has more of a knobbly tread associated with off-road tires. I also choose a slightly bigger 2.0 inch front tire compared to the 1.75 rear. So the front tire will have greater grip in rough conditions, allowing turns on gravel and mud where the rear tire would slide out, but also sacrificing a little speed on paved roads and a small amount puncture resistance. | |||||
| Tubes | $10.00 | Specialized | 26″ x 1.5″/2.2″ | Freewheel Cycles, San Francisco | 8 |
| The size of these tubes allows them to be used on either the front or rare wheel, making spares simpler. I wish they were slightly thicker, making them less prone to pinch-flats. | |||||
| Brakes | $125.00 | Shimano | Shimano V Brake Set LX Vintage Mountain Bike Touring BR M-570 NOS | Ebay Seller: pb*bikes | 10 |
| These are brakes from the 90’s that were shipped from a vintage-bike-part dealer in Japan. The biggest choice in brakes is disc vs rim. Modern top-end mountain bikes all ship with disc brakes. Discs give you better stopping power and because the pads aren’t braking on the rims it allows for lighter rims. There are several disadvantages to discs. The brake cables are usually hydraulic, requiring more complicated maintenance and carrying the right liquid. Small damage to the discs themselves can make them unusable, and replacement parts are less available in parts of the world where top-end bikes are rare. When touring Hispanolia (Dominican Republic & Haiti) a bend disc on the flight in meant I rode without front brakes for the first week until I could get to a place to buy a replacement. Finally, the discs create an uneven torque by breaking on one side, combined with an asymmetrical wheel build that is flatter on the disc side to make room for it. Cycling across Alaska, I broke most of my spokes breaking a low speeds because of this problem. A problem is that top-end rim brakes (like v-brakes) are rarer since top-end mountain bikes moved to disc brakes, and most frames today don’t even have mounts for rim brakes if you want to swap them out. These particular v-brakes I installed have an extra system that keeps the pads parallel with rims, no matter how worn down that pads are. This gives a consistent braking power that people like with rim brakes. Unfortunately, Shimano discontinued this feature in their recent v-brakes, which is why I had to buy these from a vintage dealer. The extra moving part is another point of failure, but I used a set of these brakes across Asia and Europe and my brother Paul took the same bike across the Africa and the Andes. In all the riding the one set never failed, so the extra moving part hasn’t been a problem. If they break, rim are more available anywhere in the world, although this is changing. | |||||
| Brake Levers | $24.99 | Shimano | BL-M421 | Valencia Cycles | 7 |
| These were the best v-brake levers at the store, from a limited selection. I didn’t note the model: I will probably replace them with something more specific to the butterfly handlebars when I’ve ridden with them for a while and worked out which hand locations on the bars that I’d like to have access to the bars on. | |||||
| Handlebar | $18.34 | XLC | XLC Multi Functional Trekking Bar, 580mm, 25.4, Black | Bicycle Addition (Amazon) | 9 |
| These are known as ‘butterfly’ bars. In the past I’ve only ridden with standard mountain bike straight handle bars, with bar-end extensions. Every tourer I’ve met on the road with these have praised them, so I’m trying them out. So far they are good, but it looks like it will hard to optimize access to brakes in every riding position. | |||||
| Bar Tape | $11.98 | SRAM | Supercork Bicycle Bar Tape (Black) | Bike World USA (Amazon) | 8 |
| I didn’t know much about bar tape going into this project. This got good reviews online: cork has some natural shock absorption properties. It feels a little better than the rubber I’ve used in the past, but has slipped around a little. | |||||
| Bar Gel | $20.49 | Fizik | Fizik Bar Gel with Four Pieces | Bike to the Future (Amazon) | 10 |
| These act as shock-absorbers on the parts of the handlebars where I put the most weight. In every past tour before the Pacific Northwest, I would get numb hands from where my palms put pressure on the handlebars. I assumed this was unavoidable, but it didn’t happen in the latest trip, and I think that these are reason. | |||||
| Bell | $10.69 | Mirrycle | Mirrycle Incredibell Big Bicycle Bell (Brass) | Think Fast (Amazon) | 11 |
| The brakes happened to be gold, which motivated using gold as a feature color elsewhere on the bike. My very first childhood bmx bike had a gold bell, which I was embarrassed about at the time but I now think is awesome, so this is also a throwback to the same bell I had as a kid. | |||||
| Misc Labor | $80.00 | Valencia St Cycles | Check-up / replace cranks | Valencia St Cycles | 10 |
| Special thanks to JR at Valencia st for doing most of this work! | |||||
| Handlebar stem | $24.99 | Shimano | ? | Valencia St Cycles | 8 |
| I’m likely to replace this with a shorter stem made for down-hill mountain biking. I’d prefer to have the closest cross-bar of the handlebars closer to the seat for more upright riding. The butterfly handlebars still offer the side and further forward grip points, so I’m not sacrificing the more streamlined options. Using a down-hill stem will ensure that it is sturdy enough to load up the handlebars with gear, too – I liked riding with a bar-bag and tent strapped beneath it cycling across Alaska and it’s something I might try again instead of front panniers. | |||||
In addition to the individual components, there’s one thing I really like about how it all comes together: the cabling is incredibly simple, protected at most points, and only dips below the top of the wheel to connect to the rear hub gears:
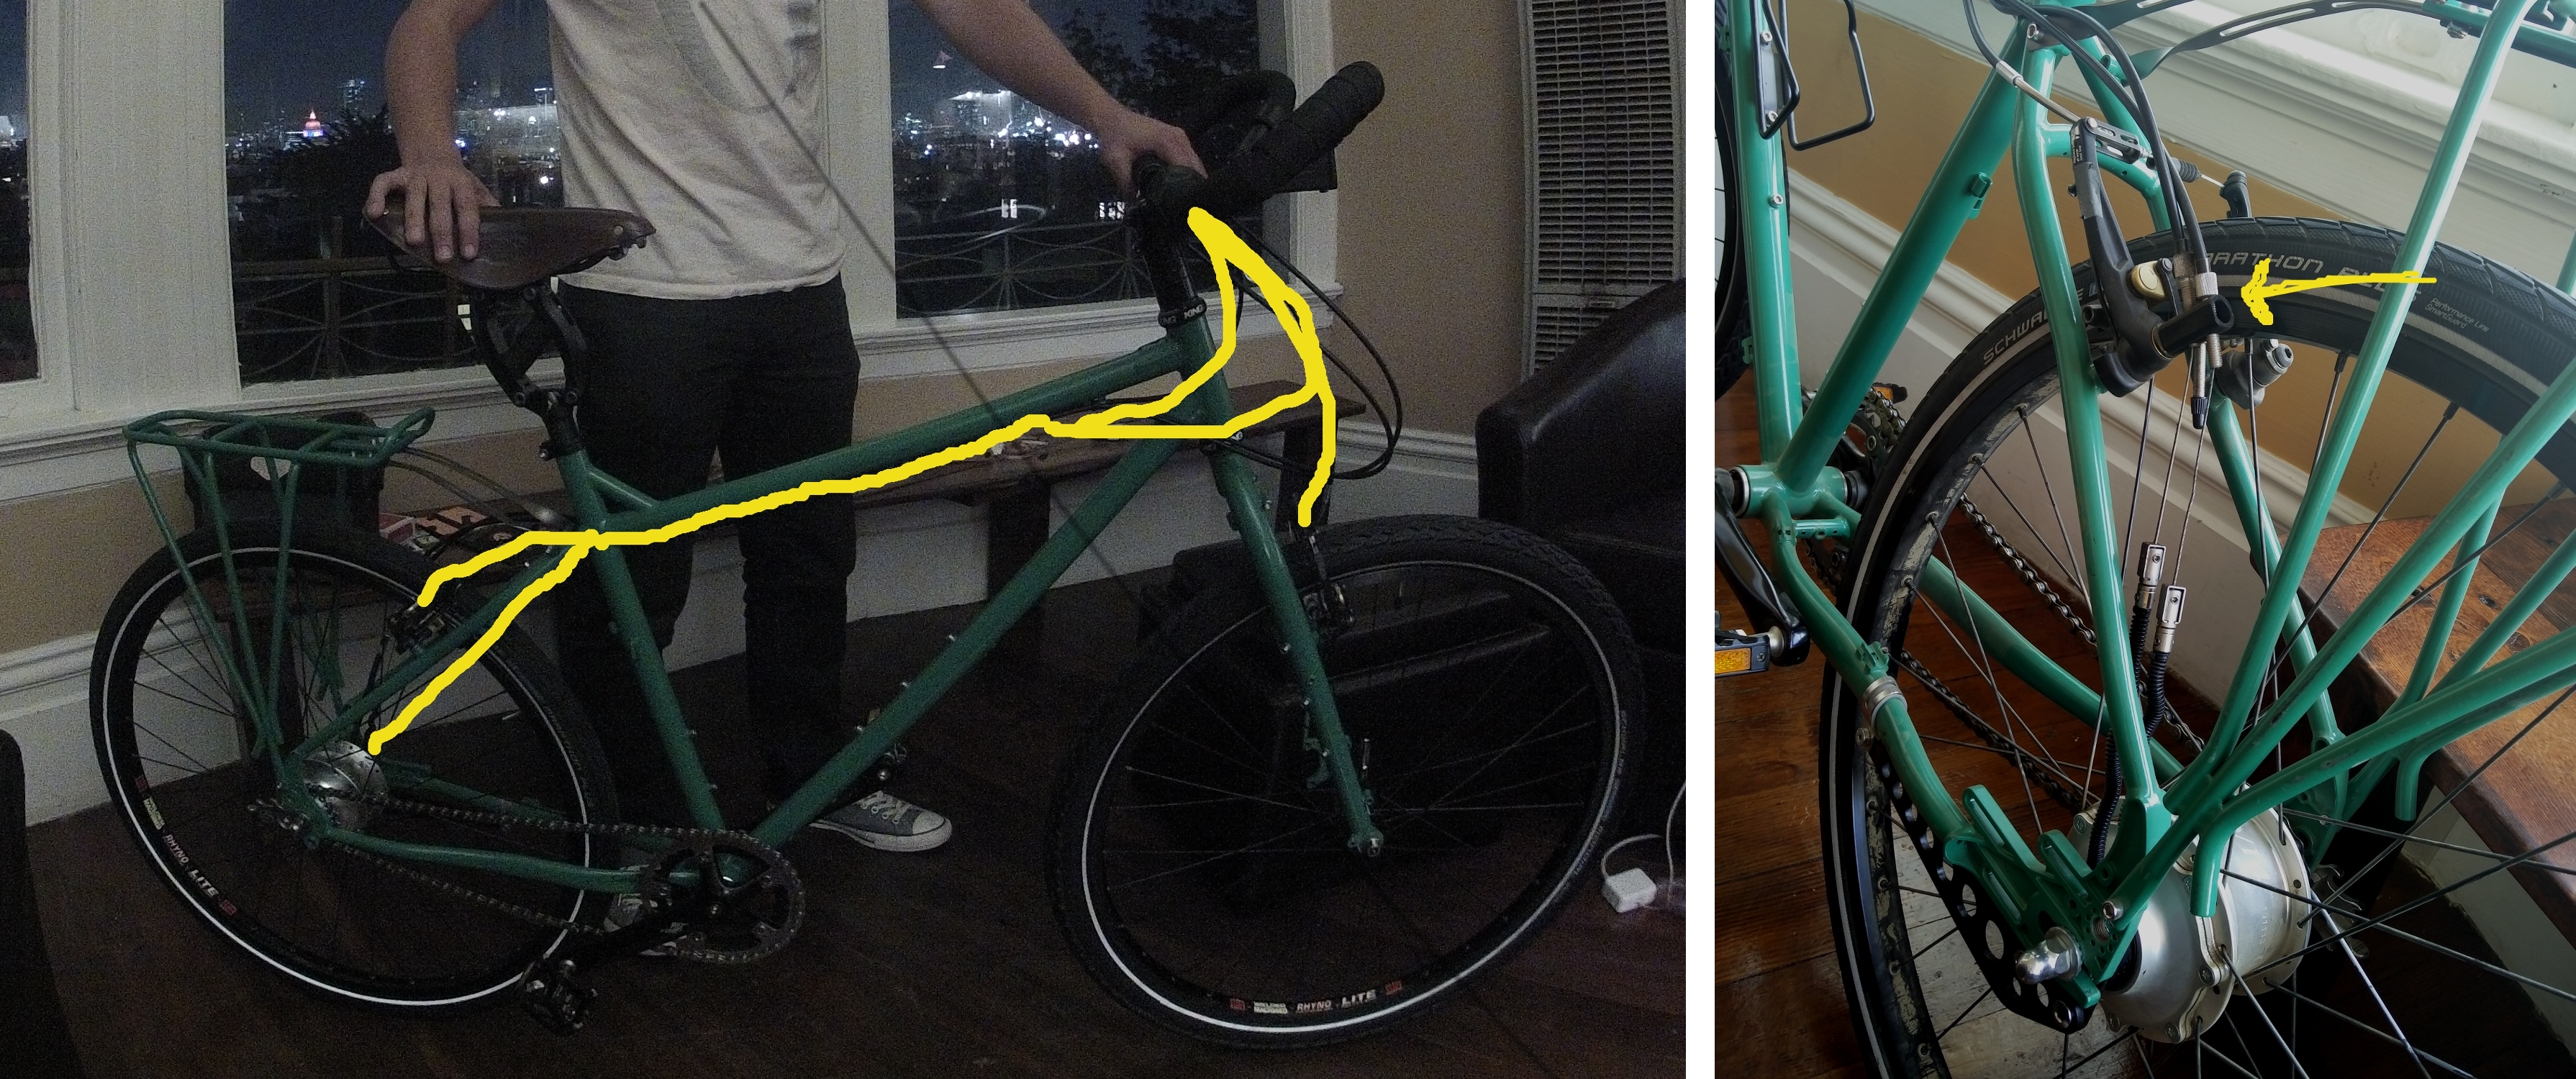
The cables on the bike, running only along the top of frame, except where they meet the rear gear hub.
This setup means that I can cycle through mud or water up to 2-feet deep without it getting inside the cables, and also that they are free from the lower parts where shallower mud and water splatters the heaviest. It also means there’s less cabling hanging off to get snagged in sticks while riding or anything else when thrown on/in a bus, truck or other transport. With the v-brakes, the rear-hub can be threaded from the more protected higher angle (see right-side of image above) something not possible on the majority of top-end new mountain bike frames since disc-brakes became popular. The rear hub also uses the same gauge of cable and housing, making the parts interchangeable with the brakes, and the only place the cables go below the top of the wheels is for the hub, when they go behind the frame and rack which add extra protection.
Keep the questions coming about the build – happy to share more details!
Rob
November 23rd, 2015 at 6:09 pm
I think the best v-brakes are the XTR from 90’s. I have mountain bike with these and mavic ceramic rims. One of the best setups i have found.
Walt